** 대다수의 GUI Programming의 방식
=> 디자인을 위한 파일과 이 디자인을 동적으로 제어하는 파일을 pair로 제공하는 경우가 많음
디자인하는 파일에 직접 코드를 작성할 수 있는 방법과 컴포넌트를 드래그 앤 드롭을 배치한 후 조정하는 방식을 제공
** 문자열을 정수로 변환하는 알고리즘
String str = "123";
int result = 0;
for(int i=0; i<str.length; i++){
char ch = str.charAt(i);
result = result * 10 + (ch-48);
}
** RelativeLayout
=> 위젯과 부모와의 위치 또는 위젯끼리의 관계를 이용해서 배치하는 레이아웃
첫 번째 위젯은 부모와의 관계로 배치를 하고 두 번째 위젯부터는 다른 위젯과의 관계를 이용해서 배치
자바 코드에서 사용하지 않는 위젯이라도 다른 위젯과의 관계를 위해서 id를 설정
=> 레이아웃도 위에서 아래로 읽기 때문에 기준이 되는 위젯을 먼저 생성
관계를 설정하는 속성
<RelativeLayout>
<View android:id="@+id/a"/>
<View layout_above="@id/a"/> //이 View는 a의 위에 생성
</RelativeLayout>
=> layout_ 로 시작하는 속성으로 배치
Left 대신에 start를 사용할 수 있다. : toLeftOf 대신에 toStartOf 가 가능
right 대신에 end를 사용할 수 있다.
=> to 대신에 align으로 시작하면 맞춤을 설정
=> alignParent로 시작하면 부모 뷰를 기준으로 맞춤을 설정
<?xml version="1.0" encoding="utf-8"?>
<RelativeLayout xmlns:android="http://schemas.android.com/apk/res/android"
    xmlns:app="http://schemas.android.com/apk/res-auto"
    xmlns:tools="http://schemas.android.com/tools"
    android:layout_width="match_parent"
    android:layout_height="match_parent"
    tools:context=".MainActivity">
    <!-- 부모 뷰의 오른쪽 끝에 베치 -->
    <TextView
        android:layout_width="wrap_content"
        android:layout_height="wrap_content"
        android:text="기준"
        android:textSize="15sp"
        android:id="@+id/base"
        android:layout_alignParentRight="true"
        />
    <!-- base라는 id를 가진 뷰의 왼쪽에 배치 -->
    <TextView
        android:layout_width="wrap_content"
        android:layout_height="wrap_content"
        android:text="왼쪽"
        android:textSize="15sp"
        android:layout_toLeftOf="@+id/base"
        />

</RelativeLayout>
** FrameLayout
=> 하위 뷰를 무조건 왼쪽 상단을 기준으로 배치
=> 2개 이상의 하위 뷰를 배치하면 겹쳐서 출력
=> 실행중에 addView나 removeView를 이용해서 하위를 추가하거나 삭제할 수 있다.
=> 하위 뷰의 출력 속성을 조절해서 보이고 보이지 않게 할 수도 있다.
visibility라는 속성을 이용하고 View클래스의 상수로 설정
=> FrameLayout으로 이미지 뷰와 버튼을 배치
1. 출력할 이미지를 res/drawable 에 복사
2. 레이아웃 파일을 수정 - /res/layout 의 activity_frame_user.xml 파일
<?xml version="1.0" encoding="utf-8"?>
<FrameLayout xmlns:android="http://schemas.android.com/apk/res/android"
    xmlns:app="http://schemas.android.com/apk/res-auto"
    xmlns:tools="http://schemas.android.com/tools"
    android:layout_width="match_parent"
    android:layout_height="match_parent"
    tools:context=".FrameUse">
    <!-- 이미지 뷰를 화면에 가득차게 배치 -->
    <ImageView
        android:layout_width="match_parent"
        android:layout_height="match_parent"
        android:src="@drawable/tigers"
        android:adjustViewBounds="true"/>
    <!-- 버튼추가 -->
    <Button
        android:layout_width="match_parent"
        android:layout_height="wrap_content"
        android:text="해태 타이거즈"
        android:textSize="30sp"/>

</FrameLayout>
** TableLayout
=> 테이블을 만들어서 배치하는 레이아웃
=> TableRow 태그를 이용해서 행을 생성하고 그 안에 위젯을 배치
=> 높이는 무조건 wrap_content
=> 너비는 무조건 match_parent
하나의 셀에 하나의 view만 배치가 가능
하나지만 Layout을 배치하면 여러 개의 위젯 가능
=> 각 셀에 배치되는 위젯의 높이와 너비를 설정하지 않는다.
** GridLayout
=> 테이블 구조로 뷰를 배치
=> layout_columnSpan 이나 layout_rowSpan 속성을 이용해서 여러 개의 열이나 행을 합쳐서 하나의 셀을 생성하는 것이 가능하다.
=> 계산기 모양 : LinearLayout 과 GridLayout 이용
<?xml version="1.0" encoding="utf-8"?>
<LinearLayout xmlns:android="http://schemas.android.com/apk/res/android"
    xmlns:app="http://schemas.android.com/apk/res-auto"
    xmlns:tools="http://schemas.android.com/tools"
    android:layout_width="match_parent"
    android:layout_height="match_parent"
    tools:context=".Calculator"
    android:orientation="vertical">
    <!-- weight는 비율을 가지고 크기를 결정, gravity는 내용물의 맞춤 -->
    <TextView
        android:layout_width="match_parent"
        android:layout_height="0dp"
        android:layout_weight="1"
        android:text="0"
        android:textSize="30dp"
        android:gravity="bottom|right"/>

    <!-- 하단의 버튼 영역 -->
    <LinearLayout
        android:layout_width="match_parent"
        android:layout_height="wrap_content"
        android:orientation="horizontal">
        <!-- 숫자 영역을 만들어줄 레이아웃 -->
        <TableLayout
            android:layout_width="0dp"
            android:layout_height="match_parent"
            android:layout_weight="3">
            <TableRow>
                <Button
                    android:layout_weight="1"
                    android:layout_width="0dp"
                    android:text="7"
                    android:paddingTop="32dp"
                    android:paddingBottom="32dp"
                    />
                <Button
                    android:layout_weight="1"
                    android:layout_width="0dp"
                    android:text="8"
                    android:paddingTop="32dp"
                    android:paddingBottom="32dp"
                    />
                <Button
                    android:layout_weight="1"
                    android:layout_width="0dp"
                    android:text="9"
                    android:paddingTop="32dp"
                    android:paddingBottom="32dp"
                    />
            </TableRow>
            <TableRow>
                <Button
                    android:layout_weight="1"
                    android:layout_width="0dp"
                    android:text="4"
                    android:paddingTop="32dp"
                    android:paddingBottom="32dp"
                    />
                <Button
                    android:layout_weight="1"
                    android:layout_width="0dp"
                    android:text="5"
                    android:paddingTop="32dp"
                    android:paddingBottom="32dp"
                    />
                <Button
                    android:layout_weight="1"
                    android:layout_width="0dp"
                    android:text="6"
                    android:paddingTop="32dp"
                    android:paddingBottom="32dp"
                    />
            </TableRow>
            <TableRow>
                <Button
                    android:layout_weight="1"
                    android:layout_width="0dp"
                    android:text="1"
                    android:paddingTop="32dp"
                    android:paddingBottom="32dp"
                    />
                <Button
                    android:layout_weight="1"
                    android:layout_width="0dp"
                    android:text="2"
                    android:paddingTop="32dp"
                    android:paddingBottom="32dp"
                    />
                <Button
                    android:layout_weight="1"
                    android:layout_width="0dp"
                    android:text="3"
                    android:paddingTop="32dp"
                    android:paddingBottom="32dp"
                    />
            </TableRow>
            <TableRow>
                <Button
                    android:layout_weight="1"
                    android:layout_width="0dp"
                    android:text="."
                    android:paddingTop="32dp"
                    android:paddingBottom="32dp"
                    />
                <Button
                    android:layout_weight="1"
                    android:layout_width="0dp"
                    android:text="0"
                    android:paddingTop="32dp"
                    android:paddingBottom="32dp"
                    />
                <Button
                    android:layout_weight="1"
                    android:layout_width="0dp"
                    android:text="-"
                    android:paddingTop="32dp"
                    android:paddingBottom="32dp"
                    />
            </TableRow>
        </TableLayout>

            <!-- 연산자 버튼을 배치시킬 레이아웃 -->
            <GridLayout
                android:layout_width="0dp"
                android:layout_weight="1"
                android:layout_height="match_parent"
                android:orientation="vertical">
                <Button
                    android:text="C"
                    android:paddingTop="18dp"
                    android:paddingBottom="18dp"/>
                <Button
                    android:text="/"
                    android:paddingTop="18dp"
                    android:paddingBottom="18dp"/>
                <Button
                    android:text="*"
                    android:paddingTop="18dp"
                    android:paddingBottom="18dp"/>
                <Button
                    android:text="-"
                    android:paddingTop="18dp"
                    android:paddingBottom="21dp"/>
                <Button
                    android:text="+"
                    android:paddingTop="18dp"
                    android:paddingBottom="18dp"/>
                <Button
                    android:text="="
                    android:paddingTop="18dp"
                    android:paddingBottom="18dp"/>
            </GridLayout>
    </LinearLayout>
</LinearLayout>
** ConstaintLayout
=> RelativeLayout 처럼 다른 위젯과의 관계를 이용해서 배치를 하는 옵션이 조금 더 다양하고 parent의 위치를 기준으로 배치
=> Margin의 옵션이 다양 : 일반 Margin 외에 goneMargin으로 뷰가 사라졌을 때의 마진을 별도로 설정할 수 있다.
** Scroll View (개념을 꼭 기억하자)
=> 자식 뷰가 부모 뷰의 크기보다 큰 경우 그냥 배치하면 부모 뷰의 영역을 넘어선 부분은 출력되지 않는다.
스크롤이 가능한 뷰를 만들고 그 안에 자식 뷰를 추가해야 한다.
ScrollView는 하나의 자식 뷰만 갖는다.
=> 수직 방향의 스크롤이 가능한 뷰이고 좌우 스크롤이 가능한 View는 HorizontalScrollView이다.
=> ListView, MapView, WebView 등은 ScrollView의 하위 클래스라서 기본적으로 스크롤이 구현되어 있다.
이 클래스들은 재사용 가능한 Deque 자료 구조를 이용한다.
** AbsoluteLayout
=> 관계나 순서에 산관없이 화면의 좌상단을 기준으로지정한 절대 좌표에 차일드 뷰를 배치하는 방법으로 공식 문서에서는 deprecated 되었으며 RelativeLayout, FrameLayout을 사용하도록 권장
** LinearLayout과 FrameLayout을 이용해서 버튼을누르면 화면에 출력되는 내용을 변경
=> View를 변경해서 화면 전환
=> 버튼을 3개 배치하고 3개의 화면을 전환
1. 실행가능한 레이아웃을 추가
2. 레이아웃 수정
<?xml version="1.0" encoding="utf-8"?>
<LinearLayout xmlns:android="http://schemas.android.com/apk/res/android"
    xmlns:app="http://schemas.android.com/apk/res-auto"
    xmlns:tools="http://schemas.android.com/tools"
    android:layout_width="match_parent"
    android:layout_height="match_parent"
    tools:context=".Overlapping"
    android:orientation="vertical">

    <LinearLayout
        android:layout_width="match_parent"
        android:layout_height="wrap_content"
        android:orientation="horizontal">
        <Button
            android:layout_width="wrap_content"
            android:layout_height="wrap_content"
            android:text="1 페이지"
            android:id="@+id/btn1"/>
        <Button
            android:layout_width="wrap_content"
            android:layout_height="wrap_content"
            android:text="2 페이지"
            android:id="@+id/btn2"/>
        <Button
            android:layout_width="wrap_content"
            android:layout_height="wrap_content"
            android:text="3 페이지"
            android:id="@+id/btn3"/>
    </LinearLayout>
    <FrameLayout
        android:layout_width="match_parent"
        android:layout_height="match_parent">
        <LinearLayout
            android:layout_width="match_parent"
            android:layout_height="match_parent"
            android:id="@+id/page1"
            android:orientation="horizontal"
            android:background="#ff0000">
        </LinearLayout>
        <LinearLayout
            android:layout_width="match_parent"
            android:layout_height="match_parent"
            android:id="@+id/page2"
            android:orientation="horizontal"
            android:background="#00ff00">
        </LinearLayout>
        <LinearLayout
            android:layout_width="match_parent"
            android:layout_height="match_parent"
            android:id="@+id/page3"
            android:orientation="horizontal"
            android:background="#0000ff">
        </LinearLayout>
    </FrameLayout>
</LinearLayout>
3. Activity.java 파일에 인스턴스 변수 선언
package com.example.android0715;

import androidx.appcompat.app.AppCompatActivity;

import android.os.Bundle;
import android.widget.Button;
import android.widget.LinearLayout;

public class Overlapping extends AppCompatActivity {

    @Override
    protected void onCreate(Bundle savedInstanceState) {
        Button btn1, btn2, btn3;
        LinearLayout page1, page2, page3;

        super.onCreate(savedInstanceState);
        setContentView(R.layout.activity_overlapping);
    }
}
4. Activity.java 파일의 onCreate 메소드에 작성
package com.example.android0715;

import androidx.appcompat.app.AppCompatActivity;

import android.os.Bundle;
import android.view.View;
import android.widget.Button;
import android.widget.LinearLayout;

public class Overlapping extends AppCompatActivity {

    @Override
    protected void onCreate(Bundle savedInstanceState) {
        final Button btn1, btn2, btn3;
        final LinearLayout page1, page2, page3;

        super.onCreate(savedInstanceState);
        setContentView(R.layout.activity_overlapping);

        //뷰 찾아오기
        btn1 = (Button)findViewById(R.id.btn1);
        btn2 = (Button)findViewById(R.id.btn2);
        btn3 = (Button)findViewById(R.id.btn3);

        page1 = (LinearLayout)findViewById(R.id.page1);
        page2 = (LinearLayout)findViewById(R.id.page2);
        page3 = (LinearLayout)findViewById(R.id.page3);

        //버튼 이벤트 처리
        btn1.setOnClickListener(new View.OnClickListener() {
            @Override
            public void onClick(View view) {
                //페이지1만 출력하고 나머지는 숨기기
                page1.setVisibility(View.VISIBLE);
                page2.setVisibility(View.INVISIBLE);
                page3.setVisibility(View.INVISIBLE);
                btn1.setVisibility(View.GONE);
            }
        });
        btn2.setOnClickListener(new View.OnClickListener() {
            @Override
            public void onClick(View view) {
                //페이지2만 출력하고 나머지는 숨기기
                page1.setVisibility(View.INVISIBLE);
                page2.setVisibility(View.VISIBLE);
                page3.setVisibility(View.INVISIBLE);
            }
        });
        btn3.setOnClickListener(new View.OnClickListener() {
            @Override
            public void onClick(View view) {
                //페이지3만 출력하고 나머지는 숨기기
                page1.setVisibility(View.INVISIBLE);
                page2.setVisibility(View.INVISIBLE);
                page3.setVisibility(View.VISIBLE);
            }
        });
    }
}
** TabHost
=> 탭을 만들기 위한 레이아웃이다.
1. 3개의 구조
TabHost : 탭 전체 영역
TabWidget : 탭 버튼 영역
FrameLayout : 탭 버튼을 눌렀을 때 보여질 영역
2. 생성
=> TabHost를 이용해서 전체 영역 생성
=> TabHost 영역안에 LinearLayout을 이용해서 TabWidget을 생성하고 FrameLayout 을 생성
=> java 코드에서 TabHost.TabSpec 를 생성해서 아이콘 모양을 생성하고 출력할 영역을 지정해서 사용
3. 실습 - 3개의 화면을 가진 탭을 생성
1) 각 탭에 사용할 icon 이미지를 프로젝트에 추가
2) 실행 가능한 Activity 추가
3) 레이아웃 수정
<?xml version="1.0" encoding="utf-8"?>
<TabHost xmlns:android="http://schemas.android.com/apk/res/android"
    xmlns:app="http://schemas.android.com/apk/res-auto"
    xmlns:tools="http://schemas.android.com/tools"
    android:layout_width="match_parent"
    android:layout_height="match_parent"
    tools:context=".TabUse"
    android:id="@+id/host">

    <!-- 탭 위젯 영역과 콘텐츠 영역의 위치를 설정 -->
    <LinearLayout
        android:layout_width="match_parent"
        android:layout_height="match_parent"
        android:orientation="vertical">
        <!-- 탭 위젯 영역 -->
        <TabWidget
            android:id="@android:id/tabs"
            android:layout_width="match_parent"
            android:layout_height="wrap_content"
            android:background="@color/colorPrimary"/>
        <FrameLayout
            android:layout_width="match_parent"
            android:layout_height="wrap_content"
            android:id="@android:id/tabcontent">

            <TextView
                android:layout_width="match_parent"
                android:layout_height="match_parent"
                android:text="TAB ONE"
                android:textSize="30dp"
                android:id="@+id/tab1"/>
            <TextView
                android:layout_width="match_parent"
                android:layout_height="match_parent"
                android:text="TAB TWO"
                android:textSize="30dp"
                android:id="@+id/tab2"/>
            <TextView
                android:layout_width="match_parent"
                android:layout_height="match_parent"
                android:text="TAB THREE"
                android:textSize="30dp"
                android:id="@+id/tab3"/>

        </FrameLayout>
    </LinearLayout>
</TabHost>
4) Activity.java 파일의 onCreate 메소드에 추가
package com.example.android0715;

import androidx.appcompat.app.AppCompatActivity;
import androidx.core.content.res.ResourcesCompat;

import android.os.Bundle;
import android.widget.TabHost;

public class TabUse extends AppCompatActivity {

    @Override
    protected void onCreate(Bundle savedInstanceState) {
        super.onCreate(savedInstanceState);
        setContentView(R.layout.activity_tab_use);

        //TabHost 찾아오기
        TabHost host = (TabHost)findViewById(R.id.host);
        //탭 설정 시작
        host.setup();

        //첫 번째 탭 설정
        TabHost.TabSpec spec = host.newTabSpec("탭1");
        spec.setIndicator(null, ResourcesCompat.getDrawable(
                getResources(),R.drawable.tab_icon1, null));
        spec.setContent(R.id.tab1);
        host.addTab(spec);

        //새로운 탭 생성
        spec = host.newTabSpec("탭2");
        //탭 아이콘 설정
        spec.setIndicator(null, ResourcesCompat.getDrawable(
                getResources(),R.drawable.tab_icon2, null));
        //탭에 보여질 내용 설정
        spec.setContent(R.id.tab2);
        //탭 추가
        host.addTab(spec);

        //새로운 탭 생성
        spec = host.newTabSpec("탭3");
        //탭 아이콘 설정
        spec.setIndicator(null, ResourcesCompat.getDrawable(
                getResources(),R.drawable.tab_icon3, null));
        //탭에 보여질 내용 설정
        spec.setContent(R.id.tab3);
        //탭 추가
        host.addTab(spec);
    }
}
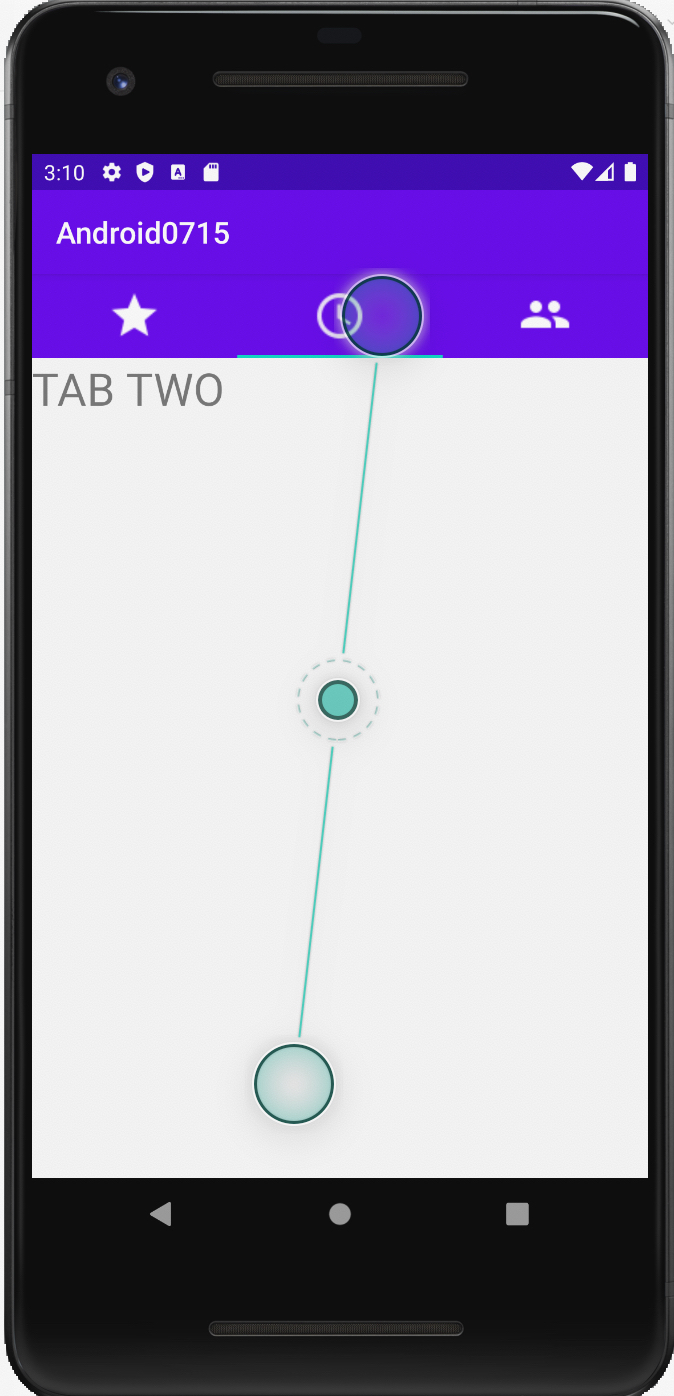 |
3개의 탭을 가진 화면이 만들어 졌다.
** SlidingDrawer
=> 핸들을 터치하면 다른 뷰가 펼쳐지듯이 아래에서 위로 출력되는 레이아웃
=> handle 속성에 터치할 핸들을 지정하고 content 속성에 펼쳐질 뷰를 설정해서 만든다.
=> SlidingDrawer를 만들면 처음에 핸들만 출력되고 핸들을 만들면 content가 출력되고 출력된 상태에서 다시 핸들을 누르면 content가 사라진다.
별도의 코드없이 layout만으로 생성
=> 최근에는 이러한 작업을 Dialog를 이용하는 것을 권장한다.
1. 실행 가능한 Activity 생성
2. layout 수정
<?xml version="1.0" encoding="utf-8"?>
<LinearLayout xmlns:android="http://schemas.android.com/apk/res/android"
    xmlns:app="http://schemas.android.com/apk/res-auto"
    xmlns:tools="http://schemas.android.com/tools"
    android:layout_width="match_parent"
    android:layout_height="match_parent"
    tools:context=".SlidingUse"
    android:orientation="vertical">

    <SlidingDrawer
        android:layout_width="match_parent"
        android:layout_height="match_parent"
        android:handle="@+id/handle"
        android:content="@+id/content">

        <ImageView
            android:layout_width="88dp"
            android:layout_height="44dp"
            android:src="@drawable/up"
            android:id="@+id/handle"/>
        <ImageView
            android:layout_width="match_parent"
            android:layout_height="match_parent"
            android:src="@drawable/box"
            android:id="@+id/content"/>

    </SlidingDrawer>

</LinearLayout>
** 사용자 알림
=> 사용자에게 특수한 상황발생을 알리는 방법
진동
소리 (시스템 사운드, 사용자 사운드)
텍스트 (토스트, 스낵바, 대화상자) : 토스트와 스낵바는 시스템에 종속적이고 대화상자는 애플리케이션에 종속 - 토스트와 스낵바는 애플리케이션이 종료되도 출력이 되지만 대화상자는 애플리케이션이 종료되면 같이 종료된다.
** 진동
=> 진동을 사용할려면 퍼미션이 필요
1. 퍼미션을 설정할 때는 manifest.xml 파일에서 application 태그 외부에 설정
진동은 <uses-permission android:name="android.permission.VIBRATE"/>
2. 진동 설정
1) 1번만 사용
Vibrator 변수 = (Vibrator)getSystemService(VIBRATE_SERVIECE);
변수vibrate(진동시간); //시간은 1/1000초 단위
2) 여러번 사용
변수.vibrate(long [], int count);
=> 첫번째 매개변수는 대기시간과 진동시간의 배열
짝수개로 대입하게 되는데 홀수 번째가 대기 시간이고 짝수 번째가 진동시간
=> 두번째 매개변수는 진동횟수
컴퓨터에게 가장 큰 수는 -1 이다. 이유는 이전에 껄 생각해보자. 배웠다. 찾아보자.
** 소리
1. 안드로이드에 내장된 사운드
Uri 변수 = RingtoneManager.getDefaultUri(RingtoneManage.TYPE_NOTIFICATION);
// NOTIFICATION 대신에 ALARM 이나 RINGTONE 사용 가능
Ringtone 링통 = RingtoneManager.getRington(getApplicationContext(), 변수);
링톤.play();
=> 안드로이드에서 getApplicationContext()는 시작하는 Activity의 참조를 리턴한다.
모든 Activity에서 저 메소드를 호출하면 시작하는 Activity의 참조를 얻어낼 수 있다.
2. 사용자 사운드
=> 사운드를 raw 디렉토리에 저장을 해서 resource로 만든다.
MediaPlayer 미디어플레이어 = MediaPlayer.create(Context context, R.raw.사운드ID);
미디어플레이어.start();
=> Context(문맥) : 데이터를 저장하는 것을 보통 Context라고 하는데 그림을 그릴 때는 그리기 위한 정보를 Context라고 한다.
안드로이드에서도 화면에 무엇인가를 출력하고자 하면 반드시 Context 정보가 있어야 한다.'
Activity가 Context를 구현한 클래스이다.
Context 대신에 Activity를 대입해주면 된다.
1. 사운드 파일을 저장할 raw 디렉토리를 res 디렉토리에 생성
=> 안드로이드에서 기본적인 리소스(이미지, 레이아웃, 색상, 스타일, 문자열, 배열 등)을 제외한 이진 파일은 raw 라는 디렉토리에 배치
2. raw 디렉토리에 효과음으로 사용할 사운드 파일을 복사
=> butterfly.wav
3. 진동을 사용하기 위한 권한을 설정
=> manifest.xml 파일에서 application 태그 외부에 작성
	<!-- 진동 사용을 위한 권한 설정 -->
    <uses-permission android:name="android.permission.VIBRATE"/>
<?xml version="1.0" encoding="utf-8"?>
<manifest xmlns:android="http://schemas.android.com/apk/res/android"
package="com.example.android0715">
<application
android:allowBackup="true"
android:icon="@mipmap/ic_launcher"
android:label="@string/app_name"
android:roundIcon="@mipmap/ic_launcher_round"
android:supportsRtl="true"
android:theme="@style/AppTheme">
<activity android:name=".SlidingUse">
<intent-filter>
<action android:name="android.intent.action.MAIN" />
<category android:name="android.intent.category.LAUNCHER" />
</intent-filter>
</activity>
<activity android:name=".TabUse">
<intent-filter>
<action android:name="android.intent.action.MAIN" />
<category android:name="android.intent.category.LAUNCHER" />
</intent-filter>
</activity>
<activity android:name=".Overlapping">
<intent-filter>
<action android:name="android.intent.action.MAIN" />
<category android:name="android.intent.category.LAUNCHER" />
</intent-filter>
</activity>
<activity android:name=".Calculator">
<intent-filter>
<action android:name="android.intent.action.MAIN" />
<category android:name="android.intent.category.LAUNCHER" />
</intent-filter>
</activity>
<activity android:name=".TableUse">
<intent-filter>
<action android:name="android.intent.action.MAIN" />
<category android:name="android.intent.category.LAUNCHER" />
</intent-filter>
</activity>
<activity android:name=".FrameUse">
<intent-filter>
<action android:name="android.intent.action.MAIN" />
<category android:name="android.intent.category.LAUNCHER" />
</intent-filter>
</activity>
<activity android:name=".MainActivity">
<intent-filter>
<action android:name="android.intent.action.MAIN" />
<category android:name="android.intent.category.LAUNCHER" />
</intent-filter>
</activity>
</application>
<!-- 진동 사용을 위한 권한 설정 -->
<uses-permission android:name="android.permission.VIBRATE"/>
</manifest>
4. 실행 가능한 Activity 추가
=> SoundNotice 이름으로 생성
5. 레이아웃을 수정
<?xml version="1.0" encoding="utf-8"?>
<LinearLayout xmlns:android="http://schemas.android.com/apk/res/android"
    xmlns:app="http://schemas.android.com/apk/res-auto"
    xmlns:tools="http://schemas.android.com/tools"
    android:layout_width="match_parent"
    android:layout_height="match_parent"
    tools:context=".SoundNotice"
    android:orientation="vertical">

    <Button
        android:layout_width="match_parent"
        android:layout_height="wrap_content"
        android:text="진동"
        android:id="@+id/vibrate"/>
    <Button
        android:layout_width="match_parent"
        android:layout_height="wrap_content"
        android:text="시스템 사운드"
        android:id="@+id/systemsound"/>
    <Button
        android:layout_width="match_parent"
        android:layout_height="wrap_content"
        android:text="사용자 사운드"
        android:id="@+id/usersound"/>

</LinearLayout>
6. Activity.java 파일의 onCreate 에 작성
package com.example.android0715;

import androidx.appcompat.app.AppCompatActivity;

import android.media.MediaPlayer;
import android.media.Ringtone;
import android.media.RingtoneManager;
import android.net.Uri;
import android.os.Bundle;
import android.os.VibrationEffect;
import android.os.Vibrator;
import android.view.View;
import android.widget.Button;

public class SoundNotice extends AppCompatActivity {

    @Override
    protected void onCreate(Bundle savedInstanceState) {
        super.onCreate(savedInstanceState);
        setContentView(R.layout.activity_sound_notice);

        //버튼 3개 찾아오기
        final Button vibrate = (Button)findViewById(R.id.vibrate);
        Button systemsound = (Button)findViewById(R.id.systemsound);
        Button usersound = (Button)findViewById(R.id.usersound);

        vibrate.setOnClickListener(new View.OnClickListener() {
            @Override
            public void onClick(View view) {
                Vibrator vibrator = (Vibrator)getSystemService(VIBRATOR_SERVICE);
                vibrator.vibrate(3000);
            }
        });

        systemsound.setOnClickListener(new View.OnClickListener() {
            @Override
            public void onClick(View view) {
                Uri s1 = RingtoneManager.getDefaultUri(RingtoneManager.TYPE_NOTIFICATION);
                //getApplicationContext()는 애플리케이션의 시작 Activity의 참조를 리턴해주는 메소드
                Ringtone ringtone = RingtoneManager.getRingtone(getApplicationContext(), s1);
                ringtone.play();
            }
        });

        usersound.setOnClickListener(new View.OnClickListener() {
            @Override
            public void onClick(View view) {
                MediaPlayer player =
                        MediaPlayer.create(SoundNotice.this, R.raw.buttoneffect);
                player.start();
            }
        });
    }
}MediaPlayer.create(SoundNotice.this, R.raw.buttoneffect); 이 문장이 가장 중요하다.
|
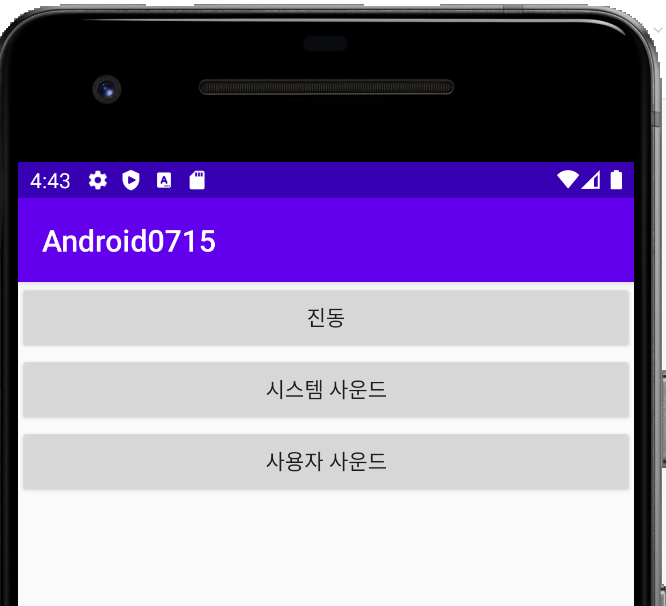 |
진동은 애뮬레이터에서 확인할 수 없지만(Xcode에서는 가능) 시스템 사운드와 사용자 사운드를 클릭하면 소리가 난다.