** Spring
=> Java Framework
=> 대규모 애플리케이션 개발에서 개발자들의 역량을 획일화해서 빠르게 구현할 수 있도록 해주는 것이 목적
=> 이러한 Java Framework로 이전에는 struts를 많이 사용
일본 같은 경우는 struts로 구현된 애플리케이션들을 유지보수하면서 사용을 하고 있다.
1. Spring Project 작업 도구
=> Eclipse(Plug In, Spring Tool Suite, 기업에서 만든 별도의 프레임워크 - 전자정부 프레임워크, Any Framework 등)
=> Intelli J - 개인 개발자나 중소기업 등에서 이용
2. Spring Project 종류
=> Legacy Project : Spring MVC Project - 이전에 사용하던 Spring Web Project, STS 4 버전이후 부터는 제공되지 않음, 기존의 대기업이나 금융, 공공기관 프로젝트가 이 방식으로 만들어져 있다.
=> Spring Boot Project(Starter Project) : 애플리케이션을 빠르게 개발하기 위해서 제공되는 템플릿 - JSP가 아니라 다른 방식으로 출력, 자체 WAS를 제공
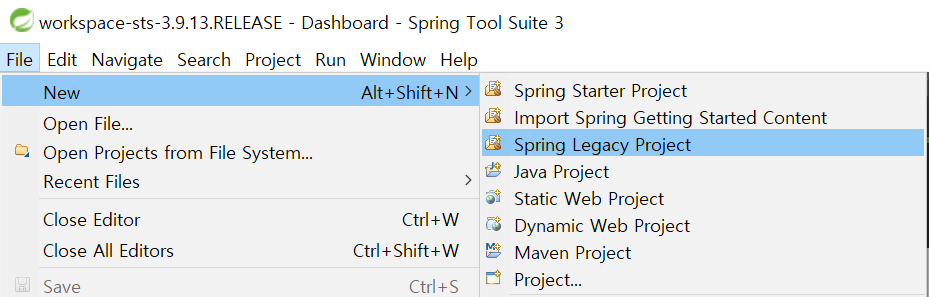
3. Spring Legacy Project
=> Maven 기반
=> Maven : Build Tool - pom.xml 파일에 프로젝트에 대한 의존성을 설정
Source -> Compile (Source 파일을 운영체제나 Virtual Machine이 알아볼 수 있는 코드로 변환 - 문법적인 오류가 있으면 컴파일 실패) -> Build (실행가능하도록 start up 코드나 컴파일된 파일들 사이의 관계를 설정) -> load (메모리에 적재) -> run (실행)
4. pom.xml
=> repositories : 중앙 저장소 이외의 곳에서 다운로드 받고자 할 때 설정
수업시간에는 Oracle 사용을 할 때 설정
기업에서는 함부로 설정하면 안됨
=> dependencies : 외부 라이브러리 사용을 설정
사용자 계정의 .m2 라는 디렉토리를 이용
외부 라이브러리 설정을 하면 먼저 m2 디렉토리에 가서 라이브러리가 있는지 확인을 하고 잇으면 그 라이브러리를 사용하고 없으면 repositories에 설정된 곳으로 가보고 그 다음 중앙 저장소에 가서 다운로드 받아서 사용한다.
제대로 다운로드 되지 않는 경우도 있고 일부분만 다운로드 되는 경우도 있으므로 m2 디렉토리를 삭제하고 다시 build를 하면 다운로드가 다시 된다.
다른 컴퓨터의 m2 디렉토리를 복사해서 사용해도 된다.
 |
 |
 |
 |
 |
이클립스에서 사용하고 싶다면
 마켓플레이스에서 위에 두개를 설치하면 Spring Project들을 사용할 수 있게 된다. |
**Spring Project 의 pom.xml
=> 프로젝트를 생성하면 Maven 설정 파일인 pom.xml 이 자동으로 생성
1. Properties
	<properties>
		<java-version>1.8</java-version>
		<org.springframework-version>5.0.7.RELEASE</org.springframework-version>
		<org.aspectj-version>1.6.10</org.aspectj-version>
		<org.slf4j-version>1.6.6</org.slf4j-version>
	</properties>
=> java version은 1.8로 변경
=> spring version을 5.0.7
=> test version을 4.11로 변경
=> properties는 자주 사용할 문자열을 하나의 태그로 만들어 둔것이다.
Class 안의 static final 상수와 같은 역할
2.dependencies
=> 외부 라이브러리를 설정하는 태그
=> scope가 생략되어 있으면 배포할 때 라이브러리도 함께 배포된다
scope에 provided가 있으면 배포할 때 이 라이브러리는 운영환경에 있는 것을 사용한다는 의미이다.
scope에 test가 있으면 이 라이브러리는 배포할 때 삭제된다.
	<dependencies>
		<!-- Spring -->
		<dependency>
			<groupId>org.springframework</groupId>
			<artifactId>spring-context</artifactId>
			<version>${org.springframework-version}</version>
			<exclusions>
				<!-- Exclude Commons Logging in favor of SLF4j -->
				<exclusion>
					<groupId>commons-logging</groupId>
					<artifactId>commons-logging</artifactId>
				 </exclusion>
			</exclusions>
		</dependency>
		<dependency>
			<groupId>org.springframework</groupId>
			<artifactId>spring-webmvc</artifactId>
			<version>${org.springframework-version}</version>
		</dependency>

		<!-- AspectJ -->
		<dependency>
			<groupId>org.aspectj</groupId>
			<artifactId>aspectjrt</artifactId>
			<version>${org.aspectj-version}</version>
		</dependency>

		<!-- Logging -->
		<dependency>
			<groupId>org.slf4j</groupId>
			<artifactId>slf4j-api</artifactId>
			<version>${org.slf4j-version}</version>
		</dependency>
		<dependency>
			<groupId>org.slf4j</groupId>
			<artifactId>jcl-over-slf4j</artifactId>
			<version>${org.slf4j-version}</version>
			<scope>runtime</scope>
		</dependency>
		<dependency>
			<groupId>org.slf4j</groupId>
			<artifactId>slf4j-log4j12</artifactId>
			<version>${org.slf4j-version}</version>
			<scope>runtime</scope>
		</dependency>
		<dependency>
			<groupId>log4j</groupId>
			<artifactId>log4j</artifactId>
			<version>1.2.15</version>
			<exclusions>
				<exclusion>
					<groupId>javax.mail</groupId>
					<artifactId>mail</artifactId>
				</exclusion>
				<exclusion>
					<groupId>javax.jms</groupId>
					<artifactId>jms</artifactId>
				</exclusion>
				<exclusion>
					<groupId>com.sun.jdmk</groupId>
					<artifactId>jmxtools</artifactId>
				</exclusion>
				<exclusion>
					<groupId>com.sun.jmx</groupId>
					<artifactId>jmxri</artifactId>
				</exclusion>
			</exclusions>
			<scope>runtime</scope>
		</dependency>

		<!-- @Inject -->
		<dependency>
			<groupId>javax.inject</groupId>
			<artifactId>javax.inject</artifactId>
			<version>1</version>
		</dependency>

		<!-- Servlet -->
		<dependency>
			<groupId>javax.servlet</groupId>
			<artifactId>servlet-api</artifactId>
			<version>2.5</version>
			<scope>provided</scope>
		</dependency>
		<dependency>
			<groupId>javax.servlet.jsp</groupId>
			<artifactId>jsp-api</artifactId>
			<version>2.1</version>
			<scope>provided</scope>
		</dependency>
		<dependency>
			<groupId>javax.servlet</groupId>
			<artifactId>jstl</artifactId>
			<version>1.2</version>
		</dependency>

		<!-- Test -->
		<dependency>
			<groupId>junit</groupId>
			<artifactId>junit</artifactId>
			<version>4.7</version>
			<scope>test</scope>
		</dependency>
	</dependencies>
<scope>provided</scope>
이 구문이 있는 건 배포시 사라지고 해당 클라이언트에 있는걸 사용하게 된다.
3. Spring MVC Project
=> Spring Web Project로 HomeController라고 하는 Controller와 메인화면에 해당하는 jsp파일도 제공한다.
** IoC(제어의 역전)
=> 일반적인 프로그래밍에서는 클래스를 개발자가 만들고 이 클래스의 인스턴스를 생성해서 사용한다.
=> 클래스를 만드는 것은 개발자가 하지만 인스턴스 생성이나 관리하는 프레임워크가 해버리는데 이러한 형태를 제어의 역전이라고 한다.
=> 대표적인 경우가 Web Programming 에서 HttpServlet으로 부터 상속받는 클래스를 우리가 디자인하지만 실제 인스턴스를 만들어서 사용하는 것은 WAS(Web Application Server - Web Container : tomcat9.0)가 한다.
=> 이렇게 하는 이유는 개발자는 비지니스 로직 작성에만 집중하도록 하기 위해서이다.
1. Factory Method Pattern
=> 생성자를 호출해서 객체를 생성하지 않고 다른 클래스의 메소드를 이용해서 객체를 생성하는 방식
DocumenBuilderFactory factory = DocumentBuilderFactory.newInstance();
DocumentBuilder builder = 여기서 인스턴스는 DocumentBuilder 클래스의 메소드를 호출하지 않고 Factory의 메소드를 호출해서 생성한다.
이렇게 하는 이유는 만드는 과정이 복잡한 경우는 만드는 메소드를 직접 호출하는 것보다는 다른 클래스의 메소드를 간단하게 호출해서 생성하는 것이 가독성을 높일 수 있기 때문이다.
2. Proxy Pattern
=> 클래스를 만들면 Framework가 다른 코드를 삽입해서 새로운 클래스를 디자인하고 우리가 사용하도록 만들어주는 패턴
개발자는 자신이 만든 클래스를 사용하고 것처럼 사용하면 된다.
=> 이런 이유로 프레임워크를 이용해서 작업을 할 때는 final class(상속을 할 수 없는 클래스)는 조심해서 생성해야 한다.
3. 인스턴스 생성은 xml 파일이나 어노테이션을 이용해서 생성
4. class는 java 디렉토리에 생성
=> 애플리케이션이 실행될 때 java 디렉토리에 잇는 것만 컴파일한다.
=> 클래스가 아닌 것은 아무 디렉토리에 만들어도 된다.
** IoC 실습
1. domain 패키지에 DTO 클래스를 생성
package com.my.app.domain;

public class Item {
	private String code;
	private String name;
	private String price;

	public Item() {
		super();
		// TODO Auto-generated constructor stub
	}

	public Item(String code, String name, String price) {
		super();
		this.code = code;
		this.name = name;
		this.price = price;
	}

	public String getCode() {
		return code;
	}

	public void setCode(String code) {
		this.code = code;
	}

	public String getName() {
		return name;
	}

	public void setName(String name) {
		this.name = name;
	}

	public String getPrice() {
		return price;
	}

	public void setPrice(String price) {
		this.price = price;
	}

	@Override
	public String toString() {
		return "item [code=" + code + ", name=" + name + ", price=" + price + "]";
	}

}
2. HomeController의 메소드에서 인스턴스를 생성해서 호출
		Item item = ItemFactory.create();

		item.setCode("001");
		item.setName("밀감");
		item.setPrice("3000");

		System.out.println(item);

		return "home";
** Factory Method Pattern 적용
1. ItemFactory 클래스를 만들고 Item 인스턴스를 만들어서 리턴하는 메소드를 생성
package com.my.app.domain;

public class ItemFactory {
	//Item 클래스의 인스턴스를 만들어서 리턴하는 메소드
	//인스턴스변수 를 안쓰는 것 같으면 static을 붙여서 빠르게 사용할 수 있다는데 먼말이냐
	public static Item create() {
		Item item = new Item();
		return item;
	}
}
2. HomeController의 메소드 수정
=> 생성자를 이용하지 않고 팩토리 클래스의 메소드를 이용해서 생성
		Item item = ItemFactory.create();

		item.setCode("001");
		item.setName("밀감");
		item.setPrice("3000");

		System.out.println(item);
** Spring 의 IoC 사용
1. appServlet.xml 파일에 작성
자기 패키지 이름 사용
<beans:bean class="com.my.app.domain.Item" />2. HomeController 클래스의 코드를 수정
상단에 작성
	@Autowired
	private Item item;
Item.java에 @Component만 적으면 위에 bean을 삭제해도 된다.
package com.my.app.domain;

import org.springframework.stereotype.Component;

@Component
** Simple Spring Maven Project 만들기 - 모레 정도까지 이방법을 사용할 텐데 이 방법은 중요하지 않다. : IoC, DI, MyBatis, Hibernate 연동을 웹이 아닌 환경에서 하려고 생성
=> STS에서 위의 프로젝트가 만들어지지 않는 경우
1. Java Project를 생성
2. Maven Project로 변환
프로젝트를 선택하고 마우스 오른쪽을 클릭하고 Configure - Convert to Maven Project 선택
3. pom.xml
https://ggangpae1.tistory.com/304?category=840479
pom.xml을 아래와 같이 수정
<project xmlns="http://maven.apache.org/POM/4.0.0"
	xmlns:xsi="http://www.w3.org/2001/XMLSchema-instance"
	xsi:schemaLocation="http://maven.apache.org/POM/4.0.0 https://maven.apache.org/xsd/maven-4.0.0.xsd">
	<modelVersion>4.0.0</modelVersion>
	<groupId>IoC</groupId>
	<artifactId>IoC</artifactId>
	<version>0.0.1-SNAPSHOT</version>
	<build>
		<sourceDirectory>src</sourceDirectory>
		<plugins>
			<plugin>
				<artifactId>maven-compiler-plugin</artifactId>
				<version>3.8.1</version>
				<configuration>
					<source>1.8</source>
					<target>1.8</target>
				</configuration>
			</plugin>
		</plugins>
	</build>
	<!-- 이 코드를 pom.xml 파일에 붙여 넣습니다. -->
	<properties>

		<!-- Generic properties -->
		<java.version>1.8</java.version>
		<project.build.sourceEncoding>UTF-8</project.build.sourceEncoding>
		<project.reporting.outputEncoding>UTF-8</project.reporting.outputEncoding>

		<!-- Spring -->
		<spring-framework.version>5.0.7.RELEASE</spring-framework.version>

		<!-- Hibernate / JPA -->
		<hibernate.version>4.2.1.Final</hibernate.version>

		<!-- Logging -->
		<logback.version>1.0.13</logback.version>
		<slf4j.version>1.7.5</slf4j.version>

		<!-- Test -->
		<junit.version>4.11</junit.version>

	</properties>

	<dependencies>
		<!-- Spring and Transactions -->
		<dependency>

			<groupId>org.springframework</groupId>
			<artifactId>spring-context</artifactId>
			<version>${spring-framework.version}</version>

		</dependency>

		<dependency>

			<groupId>org.springframework</groupId>
			<artifactId>spring-tx</artifactId>
			<version>${spring-framework.version}</version>

		</dependency>

		<!-- Logging with SLF4J & LogBack -->
		<dependency>

			<groupId>org.slf4j</groupId>
			<artifactId>slf4j-api</artifactId>
			<version>${slf4j.version}</version>
			<scope>compile</scope>

		</dependency>

		<dependency>

			<groupId>ch.qos.logback</groupId>
			<artifactId>logback-classic</artifactId>
			<version>${logback.version}</version>
			<scope>runtime</scope>

		</dependency>

		<!-- Hibernate -->

		<dependency>

			<groupId>org.hibernate</groupId>
			<artifactId>hibernate-entitymanager</artifactId>
			<version>${hibernate.version}</version>

		</dependency>

		<!-- Test Artifacts -->

		<dependency>

			<groupId>org.springframework</groupId>
			<artifactId>spring-test</artifactId>
			<version>${spring-framework.version}</version>
			<scope>test</scope>

		</dependency>

		<dependency>

			<groupId>junit</groupId>
			<artifactId>junit</artifactId>
			<version>${junit.version}</version>
			<scope>test</scope>

		</dependency>

	</dependencies>

</project>
** Spring의 IoC(Inversion Of Control)
=> 제어의 역전
=> 개발자가 만든 클래스의 제어권을 프레임워크가 가지는 것
=> 인스턴스 생성 및 관리를 개발자가 아닌 프레임워크가 하는 것
=> 목적은 개발자는 비지니스 로직 구현에만 집중하도록 하기 위한 것
1. Spring Bean
=> Spring이 만들어주는 인스턴스
2. Bean Factory
=> 스프링에서 빈을 생성하고 관리하는 인스턴스
=> 생성방법은 xml 파일을 이용해서 생성할 수 있고 환경설정 클래스를 만들어서 annotation을 이용해서 생성할 수도 있다.
=> xml 파일도 실제 실행이 될 때는 Spring 클래스로 변환이 되는데 이 때 많이 사용되는 클래스는 GenericXmlApplicationContext와 WebApplicationContext 클래스이다.
** Configuration 을 이용해서 bean 생성
1. domain.Good 클래스를 생성
src - domain - new - class
package domain;

public class Good {
	private int num;
	private String name;

	public Good() {
		super();
		// TODO Auto-generated constructor stub
	}

	public Good(int num, String name) {
		super();
		this.num = num;
		this.name = name;
	}

	public int getNum() {
		return num;
	}
	public void setNum(int num) {
		this.num = num;
	}
	public String getName() {
		return name;
	}
	public void setName(String name) {
		this.name = name;
	}

	@Override
	public String toString() {
		return "Good [num=" + num + ", name=" + name + "]";
	}
}
2. Spring Factory 클래스를 생성
=> 클래스 위에 @Configuration을 추가
=> 인스턴스를 생성해서 리턴하는 메소드위에 @Bean을 추가
=> 전자정부 프레임워크나 기업의 프레임워크는 기본적인 작업이 수행되도록 프로젝트를 생성해 준다.
설정 내용을 읽지를 못하면 수정을 못한다.
package domain;

import org.springframework.context.annotation.Bean;
import org.springframework.context.annotation.Configuration;

//Spring Bean Factory 클래스를 만들어주는 어노테이션
//annotation : 자주 사용되는 복잡한 코드를 하나의 단어로 만들어 놓은 것인데
//자바에서는 하나의 클래스이다. build 가 될 때는 자바 코드로 변경이 된다.
@Configuration
public class GoodFactory {
	//Spring 에서 Bean(인스턴스)을 생성해주는 메소드를 만들기 위한 어노테이션
	//클래스 내부에 만들어지는 메소드가 인스턴스 변수(프로퍼티)를 사용하지 않는다면
	//static 메소드로 만들어서 클래스를 가지고 바로 호출할 수 있도록 만드는 것이 효율적이다.
	@Bean
	public static Good build() {
		Good good = new Good();
		return good;
	}
}
3. main 메소드를 소유한 클래스를 만들고 main 메소드를 작성
src - new - main패키지 Main이름
=> BeanFactory 클래스를 사용하기위한 생성방법
AnnotationConfigApplicationContext 변수 = new AnnotationConfigApplicationContext(클래스이름.class);
=> BeanFactory 클래스의 메소드를 호출하는 방법
변수.getBean(String 메소드이름, 실제 생성될 클래스이름.class);
메소드 이름을 생략하면 클래스 이름과 일치하는 bean을 생성해주는 메소드를 호출하고 클래스이름을 생략하면 Object 타입으로 만들어서 리턴하기 때문에 강제 형변환을 해서 사용
package main;

import org.springframework.context.annotation.AnnotationConfigApplicationContext;

import domain.Good;
import domain.GoodFactory;

public class Main {

	public static void main(String[] args) {
		AnnotationConfigApplicationContext context =
        	new AnnotationConfigApplicationContext(GoodFactory.class);

		Good good = context.getBean("build", Good.class);
		good.setNum(1);
		good.setName("사과");
		System.out.println(good);
		context.close();
	}
}
4. Spring이 만들어주는 Bean은 기본적으로 Singleton Pattern이 적용
=> Singleton Pattern : 인스턴스를 1개만 생성할 수 있는 디자인 패턴
=> Spring으로 만든 Application이 실행되는 환경은 Server 일 가능성이 높기 때문
=> Server는 특별한 경우가 아니면 인스턴스를 1개만 생성해서 사용자의 요청을 스레드로 처리한다.
5. 2개의 객체가 동일한 객체인지 확인 - 해시코드 확인
=> 인스턴스의 hashCode() 메소드를 호출하면 안된다.
hashCode() 메소드는 재정의해서 사용하라고 제공되는 메소드이기 때문이다.
=> 해시코드는 System 클래스의 메소드를 이용해서 출력
package main;

import org.springframework.context.annotation.AnnotationConfigApplicationContext;

import domain.Good;
import domain.GoodFactory;

public class Main {

	public static void main(String[] args) {
		AnnotationConfigApplicationContext context = new AnnotationConfigApplicationContext(GoodFactory.class);

		Good good = context.getBean("build", Good.class);
		good.setNum(1);
		good.setName("사과");
		System.out.println(good);

		Good good1 = context.getBean("build", Good.class);
		good.setNum(2);
		good.setName("밀감");
		System.out.println(good);

		//해시코드 출력 - 두개가 같은 해시코드를 갖으면 같은 객체인 거다.
		//해시코드가 동일하면 동일한 메모리 영역을 사용하고 있는 것
		System.out.println(System.identityHashCode(good));
		System.out.println(System.identityHashCode(good1));

		context.close();
	}
}
Good [num=1, name=사과]
13:12:30.060 [main] DEBUG o.s.b.f.s.DefaultListableBeanFactory - Returning cached instance of singleton bean 'build'
Good [num=2, name=밀감]
296347592
296347592
같은 해시코드를 갖는다.
오후에는 xml을 이용해본다. 전통적인 방법
@Aurowired 잘 기억해보자.
** XML을 이용한 Bean 생성으로 변경
=> XML 을 이용해서 Bean을 생성하고자 할 때는 SpringBeanConfiguration파일을 추가
=> Bean 생성
<bean class = "bean을 생성할 클래스 경로" id ="아이디"/>
=> 설정 파일 불러오기
GenericXmlApplicationContext 변수 new GenericXmlApplicationContext("설정 파일 경로");
=> Bean을 가져오는 자바코드는 이전과 동일
 |
1. src 디렉토리에 SpringBeanConfiguration 파일을 추가
=> applicationContext.xml
2. Good 클래스의 Bean을 생성하는 코드를 추가
	<!-- domain.Good 클래스의 bean을 생성하는 코드 -->
	<bean class ="domain.Good" id="good"/>
3. main 메소드를 수정
package main;

import org.springframework.context.support.GenericXmlApplicationContext;

import domain.Good;

public class Main {

	public static void main(String[] args) {
		/*
		AnnotationConfigApplicationContext context = new AnnotationConfigApplicationContext(GoodFactory.class);
		*/

		//XML을 이용해서 Bean을 생성
		GenericXmlApplicationContext context = new GenericXmlApplicationContext("applicationContext.xml");

		Good good = context.getBean("good", Good.class);
		good.setNum(1);
		good.setName("사과");
		System.out.println(good);

		Good good1 = context.getBean("good", Good.class);
		good.setNum(2);
		good.setName("밀감");
		System.out.println(good1);

		//해시코드 출력 - 두개가 같은 해시코드를 갖으면 같은 객체인 거다.
		//해시코드가 동일하면 동일한 메모리 영역을 사용하고 있는 것
		System.out.println(System.identityHashCode(good));
		System.out.println(System.identityHashCode(good1));

		context.close();
	}
}
** bean 태그
=> 클래스를 등록해서 인스턴스를 생성하기 위한 태그
1. id 속성 : 구분하기 위한 식별자로 설정하지 않으면 클래스이름 #0으로 설정
2. class 속성 : 생성할 인스턴스의 클래스 경로 - 필수
3. name 속성 : id에 대한 별명인데 특수문자가 가능
4. init-method : 초기화 메소드 이름을 설정
=> 초기화 내용을 생성자에 작성하지만 직접 인스턴스 생성을 하지 않고 컨테이너나 프레임워크가 생성하는 경우에는 별도로 제공되는 초기화 메소드를 이용해서 초기화 내용을 작성
5. destroy-method : 소멸될 때 호출되는 메소드
6. lazy-init : 지연생성 여부로 true 또는 false로 설정 - 기본값은 false
=> 지연생성은 처음부터 만들어 두는 것이 아니고 처음 사용할 때 만드는 것
=> Server Application 은 일반적으로 lazy-init을 하지 않고 Client Application을 만들 때 lazy-init을 사용
=> SPA(Single Page Application)를 만들 때도 lazy-loading을 고려해야 한다.
7. scope : 기본값은 singleton인데 request, session등을 설정할 수 있다.
8. abstract : 추상클래스 여부를 설정하는 것인데 기본값은 false - 추상클래스는 인스턴스를 생성하지 않는다.
9. factory-method : 생성자가 아닌 메소드를 이용해서 인스턴스를 생성할 때 메소드 이름을 설정하는 것
** Spring DI
1. DI (Dependency Injection) : 의존성 주입
=> 클래스 내에서 사용하는 다른 클래스의 인스턴스를 클래스 내부에서 직접 생성하지 않고 외부(프레임워크 나 컨테이너)에서 만든 것을 대입받아서 사용하는 것
2. 의존성 주입을 구현하는 방법
1) 생성자를 이용하는 방법
2) setter(property) 를 이용하는 방법
=> 사용은 변수를 하는 것처럼 보이지만 실제로는 getter와 setter 메소드를 이용하는 것을 property라고 한다.
3. Bean 에서의 의존성 설정
1) 생성자를 이용하는 방법
<bean id="" class="">
	<constructor-arg value="값"/>
</bean>
=> 값이 생성자에 대입된다.
=> constructor-arg는 여러개 사용 가능
=> index 라는 속성을 이용해서 순서를 정해서 대입하는 것이 가능
=> type 이라는 속성을 이용해서 값의 자료형도설정하는 것이 가능
설정하지 않으면 기본적으로 String이지만 적당하게 형변환해서 대입된다.
=> class에 매개변수를 대입받는 생성자가 존재해야 한다.
** DI 실습
=> DTO, DAO, Service, Controller 클래스를 만들어서 작업을 수행
=> DTO는 DAO 나 Service에서 사용
=> DAO는 Service가 사용
=> Service는 Controller가 사용
1. DTO 클래스를 사용할 domain.Good 클래스를 생성
package domain;

public class Good {
	private int num;
	private String name;

	public Good() {
		super();
		// TODO Auto-generated constructor stub
	}

	public Good(int num, String name) {
		super();
		this.num = num;
		this.name = name;
	}

	public int getNum() {
		return num;
	}
	public void setNum(int num) {
		this.num = num;
	}
	public String getName() {
		return name;
	}
	public void setName(String name) {
		this.name = name;
	}

	@Override
	public String toString() {
		return "Good [num=" + num + ", name=" + name + "]";
	}
}
2. DAO 클래스를 생성 - DAO에도 템플릿 메소드 패턴을 적용하기도 함, 스프링에서는 잘 안하는데 내일 나옴
=> dao.GoodDao
package dao;

import domain.Good;

public class GoodDao {
	//메소드
	//상세보기를 위한 메소드
	//기본키를 매개변수로 받아서 하나의 DTO를 생성해서 리턴
	public Good detaol(int num) {
		Good good = new Good();
		good.setNum(1);
		good.setName("망고");
		return good;
	}
}
3. Service 인터페이스를 생성하고 메소드를 선언
=> service.GoodService (패키지명.인터페이스명)
src - new - interface에서 생성
package service;

public interface GoodService {
	//상세보기를 처리할 메소드
	public void detail();
}
4. Service 인터페이스를 implements 한 ServiceImpl 클래스를 생성
=> service.GoodServiceImpl (패키지명.클래스명)
 |
package service;

import dao.GoodDao;

public class ServiceImpl implements GoodService {
	//DAO 변수를 선언
	private GoodDao goodDao;


	public ServiceImpl() {
		super();
		//사용할 인스턴스를 직접 생성하면 의존성 주입이 아님
		goodDao = new GoodDao();
	}

	public ServiceImpl(GoodDao goodDao) {
		super();
		//직접 생성하지 않고 매개변수로 받은 것을 대입
		//이렇게 외부로 부터 받은 것을 대입하는 것을 의존성 주입이라고 한다.
		this.goodDao = goodDao;
	}

	public GoodDao getGoodDao() {
		return goodDao;
	}

	//외부로부터 매개변수로 받아서 인스턴스 변수에 대입하면 의존성 주입
	public void setGoodDao(GoodDao goodDao) {
		this.goodDao = goodDao;
	}

	@Override
	public void detail() {
		System.out.println(goodDao.detail(1));
	}

}
5. Controller로 사용할 클래스를 생성
=> controller.GoodController : 하나의 Controller 로 전부 처리할 때는 이름을 FrontController라고 하고 여러 개의 Controller로 나눌 때는 서비스이름Controller라고 한다.
package controller;

import service.GoodService;
import service.GoodServiceImpl;

public class GoodController {
	//Service 인스턴스를 저장할 변수를 생성
	private GoodService goodService;

	public GoodController() {
		super();
		goodService = new GoodServiceImpl();
	}

	public GoodController(GoodService goodService) {
		super();
		this.goodService = goodService;
	}

	public GoodService getGoodService() {
		return goodService;
	}

	public void setGoodService(GoodService goodService) {
		this.goodService = goodService;
	}

	//상세보기를 위한 메소드
	public void detail() {
		goodService.detail();
	}


}
6. main 메소드를 소유한
import controller.GoodController;
import dao.GoodDao;
import service.GoodService;
import service.GoodServiceImpl;


public class Main {

	public static void main(String[] args) {
		//Dao 인스턴스를 생성
		GoodDao goodDao = new GoodDao();
		//Service 인스턴스를 생성
		//이렇게 하면 생성자를 이용한 주입이라고 한다.
		/*
		GoodService goodService = new GoodServiceImpl(goodDao);
		 */

		//프로퍼티를 이용한 주입
		GoodService goodService = new GoodServiceImpl();
		goodService.setGoodDao(goodDao);

		//Controller를 인스턴스를 생성
		GoodController goodController = new GoodController();
		goodController.setGoodService(goodService);
		goodController.detail();
	}

}
7. 일반적인 응용프로그램은 위처럼 인스턴스를 직접 생성해서 생성자나 setter를 이용해서 주입하고 사용
** Spring에서의 의존성 주입
1. 생성자를 이용한 주입
<bean class="클래스 경로" id="구별하기 위한 식별자">
<constructor-arg value="값"/>
</bean>
=>constructor-arg는 여러 개 설정 가능
2. SpringBeanConfiguration 파일을 추가하고 Good 클래스의 bean을 생성하는 코드를 작성
 applicationContext.xml로 생성 |
<?xml version="1.0" encoding="UTF-8"?>
<beans xmlns="http://www.springframework.org/schema/beans"
	xmlns:xsi="http://www.w3.org/2001/XMLSchema-instance"
	xsi:schemaLocation="http://www.springframework.org/schema/beans http://www.springframework.org/schema/beans/spring-beans.xsd">

	<!-- 매개변수가 없는 생성자(Default Constructor)를 이용해서 bean 생성 -->
	<bean class="domain.Good" id="good"/>

</beans>
3. main 메소드에서 위의 bean을 가져와서 사용하는 코드를 작성
		GenericXmlApplicationContext context = new GenericXmlApplicationContext("applicationContext.xml");
		Good good = context.getBean("good", Good.class);
		System.out.println(good);
		context.close();
4. 실행 결과
=> 매개변수가 없는 생성자를 만들었기 때문에 기본값으로 출력
5. bean 생성 코드 변경
<?xml version="1.0" encoding="UTF-8"?>
<beans xmlns="http://www.springframework.org/schema/beans"
	xmlns:xsi="http://www.w3.org/2001/XMLSchema-instance"
	xsi:schemaLocation="http://www.springframework.org/schema/beans http://www.springframework.org/schema/beans/spring-beans.xsd">

	<!-- 매개변수가 없는 생성자(Default Constructor)를 이용해서 bean 생성 -->
<!-- 	<bean class="domain.Good" id="good"/> -->

	<!-- 매개변수가 있는 생성자를 이용-->
	<bean class="domain.Good" id="good">
		<constructor-arg value="1" />
		<constructor-arg value="수박" />
	</bean>

</beans>
6. 실행 결과
=> 생성자를 이용해서 값을 대입했기 때문에 대입한 값이 출력
7. value 대신에 다른 bean의 id를 설정하는 것도 가능
<constructor-arg>
	<ref bean ="다른 bean의 id"/>
</constructor-arg>
8. Good 클래스의 bean만드는 코드 수정
<?xml version="1.0" encoding="UTF-8"?>
<beans xmlns="http://www.springframework.org/schema/beans"
	xmlns:xsi="http://www.w3.org/2001/XMLSchema-instance"
	xsi:schemaLocation="http://www.springframework.org/schema/beans http://www.springframework.org/schema/beans/spring-beans.xsd">

	<!-- 매개변수가 없는 생성자(Default Constructor)를 이용해서 bean 생성 -->
	<!--
	<bean class="domain.Good" id="good"/>
	-->

	<!-- 매개변수가 있는 생성자를 이용-->
	<!--
	<bean class="domain.Good" id="good">
		<constructor-arg value="1" />
		<constructor-arg value="수박" />
	</bean>
	-->

	<!-- 다른 bean의 id 설정 -->
	<bean class="java.lang.String" id="name">
		<constructor-arg value="무화과"/>
	</bean>
	<bean class="domain.Good" id="good">
		<constructor-arg value="1" />
		<constructor-arg>
			<ref bean="name"/>
		</constructor-arg>
	</bean>
</beans>
9. Property를 이용한 주입
<bean class="" id="">
	<property name="프로퍼티이름" value="값"/>
</bean>
=> 프로퍼티 이름은 변수명이 아니고 setter 메소드에서 set을 제거하고 첫글자를 소문자로 변경한 것이다.
=> value 대신에 ref bean을 사용하는 것이 가능
10. Good 클래스의 bean 생성 코드 변경
<?xml version="1.0" encoding="UTF-8"?>
<beans xmlns="http://www.springframework.org/schema/beans"
	xmlns:xsi="http://www.w3.org/2001/XMLSchema-instance"
	xsi:schemaLocation="http://www.springframework.org/schema/beans http://www.springframework.org/schema/beans/spring-beans.xsd">

	<!-- 매개변수가 없는 생성자(Default Constructor)를 이용해서 bean 생성 -->
	<!--
	<bean class="domain.Good" id="good"/>
	-->

	<!-- 매개변수가 있는 생성자를 이용-->
	<!--
	<bean class="domain.Good" id="good">
		<constructor-arg value="1" />
		<constructor-arg value="수박" />
	</bean>
	-->

	<!-- 다른 bean의 id 설정 -->
	<!--
	<bean class="java.lang.String" id="name">
		<constructor-arg value="무화과"/>
	</bean>
	<bean class="domain.Good" id="good">
		<constructor-arg value="1" />
		<constructor-arg>
			<ref bean="name"/>
		</constructor-arg>
	</bean>
	 -->

	 <!-- 프로퍼티를 이용한 의존성 주입 -->
	 <bean class="java.lang.String" id="name">
	 	<constructor-arg value="오렌지"/>
	 </bean>

	 <bean class="domain.Good" id="good">
	 	<property name="num" value="3"/>
	 	<property name="name">
	 		<ref bean="name"/>
	 	</property>
	 </bean>
</beans>
11. c와 p NameSpace 이용
=> c 와 p NameSpace 를 추가하면 별도의 태그가 아니라 속성으로 생성자와 프로퍼티를 이용한 주입이 가능하다.
=> bean 태그 안에 p:프로퍼티이름="값" 또는 p:프로퍼티이름-ref="다른bean의 ID"로 설정
생성자를 이용하는 경우면 p대신에 c를 사용
 |
<beans xmlns="http://www.springframework.org/schema/beans"
	xmlns:xsi="http://www.w3.org/2001/XMLSchema-instance"
	xmlns:c="http://www.springframework.org/schema/c"
	xmlns:p="http://www.springframework.org/schema/p"
	xsi:schemaLocation="http://www.springframework.org/schema/beans http://www.springframework.org/schema/beans/spring-beans.xsd">

	<!-- 매개변수가 없는 생성자(Default Constructor)를
	이용해서 bean 생성 -->
	<!--
	<bean class="domain.Good" id="good"/>
	 -->

	<!-- 매개변수가 있는 생성자를 이용 -->
	<!--
	<bean class="domain.Good" id="good">
		<constructor-arg value="1" />
		<constructor-arg value="수박" />
	</bean>
	 -->

	 <!-- 다른 bean의  id 설정 -->
	 <!--
	 <bean class="java.lang.String" id="name">
	 	<constructor-arg value="무화과" />
	 </bean>

	 <bean class="domain.Good" id="good">
		<constructor-arg value="1" />
		<constructor-arg>
			<ref bean = "name" />
		</constructor-arg>

	</bean>
	-->


	<!-- 프로퍼티를 이용한 의존성 주입 -->
	<bean class="java.lang.String" id="name">
	 	<constructor-arg value="오렌지" />
	</bean>
	<!--
	<bean class="domain.Good" id="good">
		<property name="num" value="3" />
		<property name="name">
			<ref bean="name" />
		</property>
	</bean>
	 -->

	 <!-- p Namespace 이용 -->
	 <bean class="domain.Good" id="good" p:num="5" p:name-ref="name"/>
</beans>
** Collection Type 설정
=> List (데이터를 순서대로 연속해서 저장),
Set (데이터를 빠르게 조회하기 위해서 인덱스를 생성해서 저장),
Map (Dictionary - Key와 Value 쌍으로 데이터를 저장),
Properties (Map처럼 Key와 Value를 쌍으로 저장하는데 Key와 Value 모두 String 만 가능)
1. List
<list value-type="요소의 자료형">
	<value>값</value>
	<value>값</value>
	<value>값</value>
	....
</list>
2. Set
<set value-type="요소의 자료형">
	<value>값</value>
	<value>값</value>
	<value>값</value>
	....
</set>
3. Map
<map>
	<entry>
		<key>키</key>
		<value>값</value>
	</entry>
	<entry key="키" value="값"/>
</map>
4. Properties
<props>
	<prop key="키">값</prop>
	<prop key="키">값</prop>
</props>
** annotation을 이용한 IoC와 DI 설정
1. XML 설정 파일과 Annotation을 혼합해서 사용하고자 하는 경우
=> spring bean configuration 파일에 context 네임스페이스를 추가하고
<context:annotation-config/> 를 추가
2. @Autowired
=> 변수 위에 사용하는데 어노테이션이 추가되면 자동으로 setter를 생성하고 동일한 자료형에 bean이 있으면 자동 주입한다.
=> 이 어노테이션이 설정되어 있는데 동일한 자료형의 bean이 없으면 예외가 발생 - 주입하는데 실패했다는 메세지가 출력됨
@Autowired(required=false)로 설정하면 없어도 예외가 발생하지 않음
=> 동일한 자료형의 bean이 2개 이상 존재한다면 이 경우도 애매모호하다고 예외를 발생시킴
@Autowired(name="bean의 id)로 설정하면 id가 일치하는 bean을 주입받는다.
=> 동일한 역할을 수행하는 어노테이션으로 @Inject 그리고 @Resource(name="bean의 id") - java 1.8 버전부터 지원
3. bean을 자동생성해주는 어노테이션
=> spring bean configuration 파일에 <context:component-scan="패키지이름"/> 을 설정하면 패키지이름에 해당하는 모든 하위 패키지에서 @Component, @Repositoty, @Service, @Controller 라는 어노테이션이 붙은 클래스의 bean을 자동생성한다.
패키지 이름은 여러개 사용 가능
GoodDao
package dao;

import org.springframework.stereotype.Repository;

import domain.Good;

//bean을 자동생성해 달라고 하는 어노테이션
@Repository
public class GoodDao {
	//메소드
	//상세보기를 위한 메소드
	//기본키를 매개변수로 받아서 하나의 DTO를 생성해서 리턴
	public Good detail(int num) {
		Good good = new Good();
		good.setNum(1);
		good.setName("망고");
		return good;
	}
}
GoodServiceImpl
package service;

import org.springframework.beans.factory.annotation.Autowired;
import org.springframework.stereotype.Service;

import dao.GoodDao;

//bean을 자동생성해 달라고 하는 어노테이션
@Service
public class GoodServiceImpl implements GoodService {
	//DAO 변수를 선언
	//setter를 만들어주는 기능과 동일한 자료형의 bean을 주입받아주는 어노테이션
	@Autowired
	private GoodDao goodDao;

	@Override
	public void detail() {
		System.out.println(goodDao.detail(1));
	}

}
GoodController
package controller;

import org.springframework.beans.factory.annotation.Autowired;
import org.springframework.stereotype.Controller;

import service.GoodService;
import service.GoodServiceImpl;

@Controller
public class GoodController {
	//Service 인스턴스를 저장할 변수를 생성
	@Autowired
	private GoodService goodService;

	//상세보기를 위한 메소드
	public void detail() {
		goodService.detail();
	}
}
Main
import org.springframework.context.support.GenericXmlApplicationContext;

import controller.GoodController;

public class Main {

	public static void main(String[] args) {

		GenericXmlApplicationContext context = new GenericXmlApplicationContext("applicationContext.xml");

		GoodController goodController = context.getBean(GoodController.class);
		goodController.detail();

		context.close();
	}

}
applicationContext.xml
 |
<beans xmlns="http://www.springframework.org/schema/beans"
	xmlns:xsi="http://www.w3.org/2001/XMLSchema-instance"
	xmlns:c="http://www.springframework.org/schema/c"
	xmlns:p="http://www.springframework.org/schema/p"
	xmlns:context="http://www.springframework.org/schema/context"
	xsi:schemaLocation="http://www.springframework.org/schema/beans http://www.springframework.org/schema/beans/spring-beans.xsd
		http://www.springframework.org/schema/context http://www.springframework.org/schema/context/spring-context-4.3.xsd">

	<!-- 매개변수가 없는 생성자(Default Constructor)를
	이용해서 bean 생성 -->
	<!--
	<bean class="domain.Good" id="good"/>
	 -->

	<!-- 매개변수가 있는 생성자를 이용 -->
	<!--
	<bean class="domain.Good" id="good">
		<constructor-arg value="1" />
		<constructor-arg value="수박" />
	</bean>
	 -->

	 <!-- 다른 bean의  id 설정 -->
	 <!--
	 <bean class="java.lang.String" id="name">
	 	<constructor-arg value="무화과" />
	 </bean>

	 <bean class="domain.Good" id="good">
		<constructor-arg value="1" />
		<constructor-arg>
			<ref bean = "name" />
		</constructor-arg>

	</bean>
	-->


	<!-- 프로퍼티를 이용한 의존성 주입 -->
	<bean class="java.lang.String" id="name">
	 	<constructor-arg value="오렌지" />
	</bean>
	<!--
	<bean class="domain.Good" id="good">
		<property name="num" value="3" />
		<property name="name">
			<ref bean="name" />
		</property>
	</bean>
	 -->

	 <!-- p Namespace 이용 -->
	 <bean class="domain.Good" id="good" p:num="5" p:name-ref="name"/>

	 <context:annotation-config/>
	 <context:component-scan base-package="controller, dao, service"/>
</beans>
4. Spring Project를 만들어서 작업을 할 대는 하나의 루트 패키지를 만들고 그안에 세부적인 패키지들을 만들어서 작업을 수행하는 것이 좋다.
5. bean을 생성하는 기본적인 방법과 Controller, Service, Repository, Component를 이용한 Bean 생성과 Autowired를 설정하는 것이 가장 중요하다.